
Beginner Photography Tips: Mastering Natural Light for Better Photos
- Malia Ditto
- Jun 18, 2025
- 6 min read
Updated: Jan 4
Hey HEYYY friends- I’m currently sitting in the car waiting for my client (pro-tip, get to your sessions 30-45min early to scout the location, check the lighting, and catch up on emails or life in general;) and I wanted to write a post that I feel could be helpful to some of you on your photography journeys!
Lately, I’ve been getting a lot of inquiries to edit other photographer's photos with my MRP preset pack (which I’m always SO happy to do!) If you’re curious what your photos would look like with my presets, feel free to email 2-5 photos (RAW preferred) to maliarosephotography@gmail.com and I’ll edit + send them back to ya!!
That said, I’ve noticed one big pattern…. Many of the photos people send are just plain hard to edit - and not because they’re bad photos! Usually, it comes down to tricky lighting: deep shadows, harsh color casts, overexposed highlights. I often find myself spending extra time trying to “save” the photo, instead of enhancing it.
So let’s talk about something that’s so important but often overlooked: LIGHTING.
Lighting can truly make or break a photo. If you get it right in camera, editing becomes smoother, faster, and more fun!! In fact, a good sign you’re nailing your lighting is if you barely need to tweak your edit in post.
If you get the photo right in camera, the less edits you’ll have to make post-processing. SHOCKER I know!!! I sometimes get people who will buy my presets and get frustrated that their edits don't look like mine- and I always tell them- the key is in the lighting & getting the photo right in camera:)
I want to share some tips and tricks I’ve learned over the years to help improve your photos.
Lighting Mistakes to Avoid:
DIRECT LIGHTING: Yes, there is a time and place for direct light (ex: drama and dimension!)—but in general, direct sun creates harsh, often clipped shadows that are nearly impossible to smooth out in editing. Avoid the sun hitting your client’s face directly unless you're going for a bold look and know how to work with the shadows.
COLOR CASTS: Be aware of anything around your subject that could reflect color—grass, bright clothing, saturated backdrops. For example, lush green grass can reflect onto skin, creating a green tint that’s tough to fix. Even golden hour can produce intense orange or red color casts that overwhelm skin tones or create color banding in highlights.
A common question I get is:
“If I put the sun behind my subject, their face goes dark. If I put them facing the sun, it’s way too bright. What do I do?!”
Such a good question!! The answer is: look for even lighting—where the light falls equally across the face and body. This gives you soft shadows, balanced skin tones, and a more flattering photo overall.
My Three Favorite Lighting Scenarios:

OPEN SHADE: This is one of the most reliable, flattering light sources. Find shade next to a building, under a tree, or inside a doorway. It gives soft, even light that plays beautifully with most presets and flatters all skin tones.
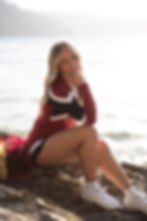
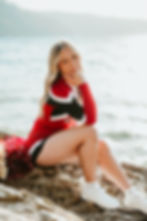
Here, the sun was coming in from the top right of the frame + I placed Nina in the complete shade. There was sun all around us, but none of that sun touched her:) Even better lighting-wise here would be to place Nina directly at the edge of the shade, right before the sun! She'd get a little more light on her face, creating beautiful catchlights!

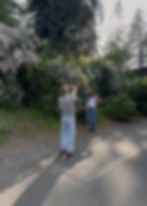
45 DEGREE ANGLE: I love positioning the sun at a 45-degree angle behind my client. It adds a little glow and depth while still keeping the face evenly lit—especially if there's some ambient fill light bouncing from the ground or surroundings.
Here, I had Alyx sit with her back to the sun and positioned myself so that my camera was at about a 45 degree angle from the sun. Even better would be to have someone behind me holding a reflector, + reflecting the light back into her face.

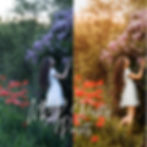
FILTERED LIGHT: This is when sunlight is softened through trees, bushes, or something semi-transparent, and your client’s back is to that light source. It creates dreamy backgrounds and a soft glow without the harshness of full sun.
Here, I had Alyx stand in front of a big bush. You can see the sun was filtered through that tall pine tree and spilling into the frame from over the top of the bush. It created a beautiful halo glow on her hair and even lighting on her face! You could also have her turn slightly to her left so the sun came in at a 45 degree angle, I just loved the look of this background with the depth of field and purple flowers from the bush!!
Now that you’ve got the tools, you can use them to level up your locations and approach.
Scout + Plan: Lighting > Location
80% of a WELL EXECUTED session is in the PLANNING! Lighting changes minute by minute, especially outdoors—so I always scout locations ahead of time and note where the sun will be during our session.
Don't be afraid to be picky about your spots! A location might look stunning, but if the lighting is harsh or uneven, it can be a struggle to shoot. For example:
Tall grass can reflect green tones onto skin
Water can reflect and blow out your background
Wide open sky can flatten the image with too much overhead light
This is an example of harsh light on water! It can be super tricky to edit. I only took one or two shots here before moving to the right so the sun was coming in from the side. Ultimately we ended up moving spots completely because the lighting was just so harsh + I didn't want to have to deal with it in post!
Lighting > Location EVERY TIME. I’ll happily shoot in a “boring” spot if it means my client is well-lit—because that will almost always lead to more flattering, loved images.
That said, you can use these tips and tricks to find pockets of usable light anywhere:
How to Find Great Light:
The Hand Trick:
Hold your hand out and slowly spin in a circle. Watch how the light changes—look for a spot where the light on your hand is even (no hot spots or deep shadows). That’s likely where you want your subject facing.
The Selfie Test:
This is my favorite version of the hand trick. Flip your camera to selfie mode and spin slowly in a circle. Notice where your skin looks soft and your eyes are bright—that’s your good light. Catchlights in the eyes? Even tone across your skin? You’re golden.
Watch the Eyes:
Catchlights (reflections of light in the eyes) are a great clue. If your subject’s eyes look dull/shadowy in the photo, you might want to switch up spots, rotate slightly, or reposition them more towards the light.
Use Reflectors (even natural ones):
A reflector bounces light back into your subject’s face to soften shadows. You can use an actual reflector—or a white wall, concrete, a white shirt, a sidewalk, etc.
Tip: Match the direction of the existing light with your reflector for a natural look.
If the light’s bad, scrap it:
If you set up a shot and chimp (peek at your camera screen) and don’t like the light—don’t be afraid to pivot. Early in my career, I’d feel nervous to change direction once I committed to a setup. But honestly? It's so worth it to admit it’s not working and move to a better spot.
Your client will respect your eye, and it saves so much editing time later!
BONUS TIP!! Shoot in RAW:
I just want to emphasize the importance of shooting in RAW! RAW files = uncompressed images that retain all the details and data. This gives you the power to:
Recover highlights and shadows
Adjust white balance without losing quality
Get the most out of your presets
If you’re not shooting RAW yet—this one switch will instantly give you more control over your edits.
If you made it this far, you’re an angel 💛 I hope these tips help you feel more confident choosing great light during your sessions—and make your editing smoother, too. You’ve got this!
If you're interested in my presets, want to improve your editing, or just need a fresh start with your photography, here are some links you might want to check out!
Location Guide Template for Photographers
Love you all SO MUCH! Please reach out if you ever have questions about anything!
FUN PHOTOGRAPHY FACT: 💡 Did you know... early portrait photographers used head braces to keep people still—because exposures took minutes?
So if your senior says “wait, what do I do with my hands?”—just be glad they don’t need a metal clamp around their skull to stay in place 😆😅📸
<3 Malia